
Background#
I’ve been tinkering with websites for almost 20 years at this point and have went through many “phases” of website building and ownership. My interests in websites was first started when I was in school in the late 90s and I created a “geocities” page that I ultimately tutorials and my teachers issued it as work to other students, making me very popular.
Years later, I stumbled across the world of “SEO” and went down a rabbit hole of small micro sites, made manually from HTML/CSS that generated income from google adwords, later switching to larger semi-authority affiliate sites based on WordPress.
More recently, I made an attempt to learn a full webapp stack with HTML, CSS, Javascript, jQuery, Node.js, Express.js, React.js along with some SQL and MongoDB. I made a site from scratch that was ultimately planned to be a scoreboard system for a game server that I was involved in running for a game called DayZ but it never made it to the finish line. Ultimately, this knowledge and skills rotted with no chase to use them.
With the advent of AI coding agents and the lowering of the bar of entry into coding custom webapps, I’ve taken up my interesting in websites again with a few in development and some more ideas floating around. I’d like however somewhere to share my work so that others may benefit from it (and I can re-read to remember) and that’s the purpose of a personal blog website.
The Goal#
The goal is to build a personal website that will provide the following:
- The space to post technical breakdowns of large pieces of professional work
- Share guides/scripts/walkthroughs that other techies may find useful
- Share passion projects and the learning that they give me
- Act as something of a portfolio of my work.
After looking through the various front and backend technologies available, I’ve landed on using quite a simple static website using Hugo to build HTML/CSS from simple markdown files. I plan to store the markdown files in GitHub and use GitHub Actions to deploy them Azure Static Web Sites as this aligns quite with with my professional role as an infrastructure engineer.
It will look something like this:
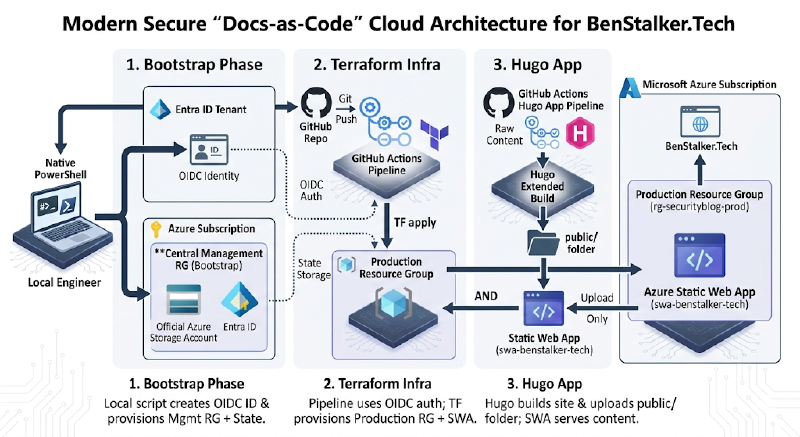
1. Bootstrap Phase (Local PowerShell)#
This is the foundational, one-time setup performed securely from the local machine before any automation begins.
- Tools: Native PowerShell on the Local Engineer machine.
- Identity Configuration: The script connects to the Entra ID Tenant and creates an App Registration (OIDC Identity). This establishes a passwordless, federated trust with GitHub.
- State Storage: It provisions a Central Management Resource Group inside the Azure Subscription, containing an Azure Storage Account. This securely air-gaps the Terraform remote state away from the production environment.
2. Terraform Infra (Automated CI/CD)#
This phase turns infrastructure into code, triggered automatically by a code push to the repository.
- Trigger: A Git Push of the Terraform files to the GitHub Repo initiates the GitHub Actions pipeline.
- Authentication: The pipeline securely logs into Azure using the OIDC Auth established in Phase 1, pulling the lock from the remote State Storage.
- Provisioning: GitHub Actions executes a
terraform apply. This deploys the actual production environment into the Azure Subscription: a Production Resource Group (rg-securityblog-prod) and an empty Azure Static Web App (swa-benstalker-tech).
3. Hugo App (Build & Deployment)#
This phase handles the actual blog content, intentionally bypassing Azure’s default Oryx build engine to avoid library conflicts and speed up deployments.
- The Build Engine: When raw Markdown content is pushed, the GitHub Actions pipeline spins up an Ubuntu runner and executes a Hugo Extended Build locally.
- The Artifact: This process compiles the Markdown, processes the theme’s SCSS, and generates a final
public/folder containing all static HTML, CSS, and JS assets. - Direct Deployment: The pipeline performs an “Upload Only” action, pushing the pre-built
public/folder directly to the waiting Azure Static Web App. - End Result: Microsoft Azure globally hosts the static files, serving fast and secure content to readers at benstalker.co.uk.
The Prerequisites#
This is going to be a long blog post where I detail the steps I’ve taken to set this blog up from scratching including the tools I used, the commands I typed etc. I’ll start with the required packages to get started with development
| Package | Install | Purpose |
|---|---|---|
| Git | https://github.com/git-guides/install-git | Required to push to GitHub Repo for Deployment |
| Go | https://go.dev/dl/ | Hugo is written in Go and needs the package installed |
| Hugo | https://gohugo.io/installation/ | This is the Hugo CLI required to initiate project and run local test server |
Once installed these packages are installed, ensure Hugo is accessible in the path environmental variable
To ensure all prerequisites are installed and working, run the following commands:
git version
go version
hugo version
Each command should give you information on the version you have installed if working correctly.
The Basic Setup#
Now we have the required packages installed, we can start to create the files for content and config. I will use VS Code for this but any text editor will be suitable.
- Navigate to the folder in which you’d like to store the project, I use a “repos” folder for all projects I use with GitHub.
- Within the terminal at this location, run the following command:
hugo new site <websitename> # for me, this is benstalker- Change directory into this folder and we can also initialize a git repository
git init
# If this is the first time you are using git, you may need to populate the following configuration items:
git config --global user.name "Your Name"
git config --global user.email "your.email@example.com"
Next, I will open up my GitHub, create a new, private repo, add it as the remote origin and push content:
git remote add origin https://github.com/ben-stalker/,newrepo>.git
git branch -M main
git add .
git commit -m "Initial commit: Hugo site structure"
git push -u origin main
Now with git set up, we can move onto installing a Hugo theme
Hugo Configuration#
The first part of configuring Hugo will be selecting and installing a theme. There are many Hugo themes available here: https://themes.gohugo.io/. I’m opting to go with a theme called Blowfish as I like the style and it has many shortcodes that I can use to enrich the visuals and add functionality to my site.
Each Hugo theme may follow a different installation and initial configuration method. For blowfish, the instructions are here: https://blowfish.page/docs/installation. I performed the following actions:
- Add the Blowfish submodule from git:
git submodule add -b main https://github.com/nunocoracao/blowfish.git themes/blowfish- Once installed, we set up the theme, the first step is to delete the default
hugo.tomlfile and replace it by copying all the*.tomlconfig files from:
\websitename\themes\blowfish\config\_default
and place them in the newly created folder:
\websitename\config\_default
Once copied, we must manually specify the theme in the copied
hugo.tomlfile near the top by uncommenting line 5:theme = "blowfish"I will also work down the
languages.tomlfile and uncomment the following lines:- Line 14 for my site description
- Lines 17 - 76 for the appropriate detail and socials
Within the
params.tomlfile, I will update the following lines- Line 8 setting
colorSchemeto “github” - Line 9 setting
defaultAppearanceto “dark”
- Line 8 setting
At this stage, I will run the local hugo “webserver” to see how we are looking so far. I do this by returning to the terminal and running:
hugo server --disableFastRender --noHTTPCacheThe two switches are useful for local development, turning off performance optimization to see all errors and correct previews and stopping any caching to ensure we are seeing latest version after any changes.
Some smaller tweaks#
I added a file
_index.mdin the root of the content folder to allow me to have a preamble before my articles are listedWithin the
params.tomlI:- Set
header.layout = "fixed-fill-blur - Set
homepage.layout = "background" - Set
homepage.homepageImage = "background.svg"# I’ll discuss this below - Set
homepage.showRecent = true - Set
homepage.cardView = true
- Set
Added a horrific AI generated image of me as
author.jpg, placed it in the/assetsfolder and linked it in thelanguages.en.tomlfile inparams.author.image = "author.jpg"and a bunch of other fields to be relevant to me.The blowfish theme has a cool animated background that I really liked and wanted to use for my site. This is achieved by using [this]https://blowfish.page/img/background.svg svg as the background image. I simply downloaded it, popped it in the asset folder and set the background image
At this stage the initial Hugo config is completed, I will commit and push the changes.
Adding initial content#
Now we have a basic layout and configuration complete, we can upload some initial content. I have 2x blog posts planned, a home page to list them on and stubs for a “Contact me” and “About me” stub page to get the basic layout.
It’s worth noting that Hugo uses “Front Matter” that will allow you to define meta data about a post or page. This is between 2x sets of --- with key value pairs such as Title: "Page Title or Tags: ["tag1", "tag2"]
Home Page#
To properly use some of the background functions and add some pre-amble text before the list or recent posts, we will create a file _index.md in the /content/ folder with the following content:
---
title: "Ben Stalker"
description: "Senior Security Infra and DevOps engineer"
layout: "background"
---

Welcome to my professional blog where I break down Security Infrastructure in Azure and M365.
This allows me to define the page title, meta description and use the background layout from the blow fish theme. The preamble text will change over time but we just need a place holder
Stub Pages#
Also within the /content/ folder, I will create pages contact.md and about.md, populate them with similar content to the above and save them.
Posts#
For the posts, I want to be able to use the thumbnails method in the blowfish theme noted [
[here]https://blowfish.page/docs/thumbnails/. Essentially, instead of just a list of posttitle.md files in a subfolder of the /content/ folder, we need to create a folder for each one, drop in the posttitle.md, renaming it to index.md along with a .jpg or .png file titled featured.xxx like this:
content └── awesome_article ├── index.md └── featured.png
In my case, my folder structure is:
content └── blog_posts └──post1 ├── index.md └── featured.jpg ├── _index.md ├── about.md └── contact.md
When it comes time for blog post 2, I will create a subfolder post2 in the blog_posts folder, create an index.md for the content and another featured.jpg for the thumbnail.
With this, I have committed and merged the changes to GitHub and will now work on the GitHub actions pipeline and the Azure hosting. Join me for Part 2 of this blog walkthrough where I describe that process.
