Hosting and Deployment#
Following on from my previous post, we now have a basic layout and first piece of content prepared. This article will deal with the setup of the Azure tenant and the deployment of both the infrastructure and website.
Overview#
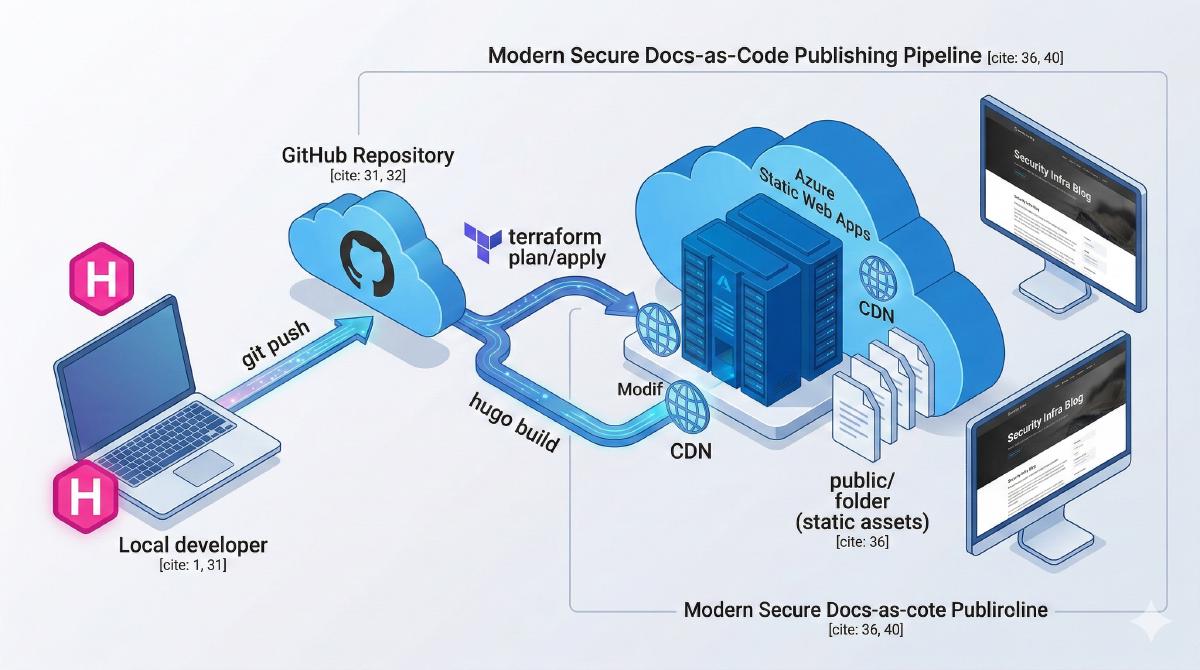
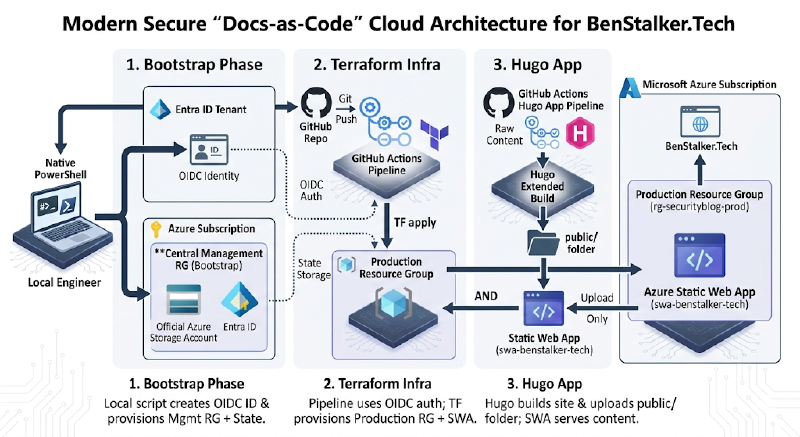
For the deployment, I will start with an empty Azure tenant. This means GitHub will not have the rights to deploy the required infra (Resource Group & Static Website) so I will need to create the resources needed to permit this. Once in place, I can deploy the actual infra required by the blog via GitHub Actions pipeline from Terraform code, my preferred method and then use the GitHub actions runner to build and deploy the Hugo blog as follows:
Please ignore the imperfect diagram, that was the best Gemini Pro 3.1 could do after 10 attempts and corrective prompts.
Initial GitHub –> Azure Connection#
The initial “bootstrap phase” will be focused on configuring the RBAC (Role Based Access Control) to allow a GitHub Identity (an EntraID service principal) the rights to deploy infrastructure to our subscription. We will also configure a storage account in which our terraform will be able to store it’s statefile. This initial setup will be handled via PowerShell as that’s my preference but could be done by Azure CLI or button clicking if you prefer.
These are the commands I wil run :
# Connect to tenant
Connect-AzAccount -Tenant "xxxx-xxxx-xxxx-xxxx-xxxx"

# Set some variables
$location = "<deplomentregion>"
$rgName = "<rgname>"
$storageName = "<saname>" # Must be globally unique

# Create the resource Group
New-AzResourceGroup -Name $rgName -Location $location

# Create the storage account
$storage = New-AzStorageAccount -ResourceGroupName $rgName -Name $storageName -SkuName "Standard_LRS" -Location $location -AllowBlobPublicAccess $false -MinimumTlsVersion TLS1_2

# Create the blob storage container
New-AzStorageContainer -Name "tfstate-blog" -Context $storage.Context

# Create the service principal
$app = New-AzADApplication -DisplayName "sp-github-actions-mgmt"
Start-Sleep -Seconds 10
$sp = New-AzADServicePrincipal -ApplicationId $app.AppId

# Grant roles
$subId = (Get-AzContext).Subscription.Id
New-AzRoleAssignment -ApplicationId $app.AppId -RoleDefinitionName "Contributor" -Scope "/subscriptions/$subId"

# Create the OIDC Trust
$fedParams = @{
    Name = "github-actions-blog"
    Issuer = "https://token.actions.githubusercontent.com"
    Subject = "repo:<githubusername>/<githubreponame>:ref:refs/heads/main"
    Description = "OIDC trust for Blog deployment"
    Audience = @("api://AzureADTokenExchange")
}
New-AzADAppFederatedCredential -ApplicationObjectId $app.Id @fedParams

# Output the vars for GitHub secrets
Write-Host "AZURE_CLIENT_ID       : $($app.AppId)"
Write-Host "AZURE_TENANT_ID       : $((Get-AzContext).Tenant.Id)"
Write-Host "AZURE_SUBSCRIPTION_ID : $subId"
GitHub Secrets Setup#
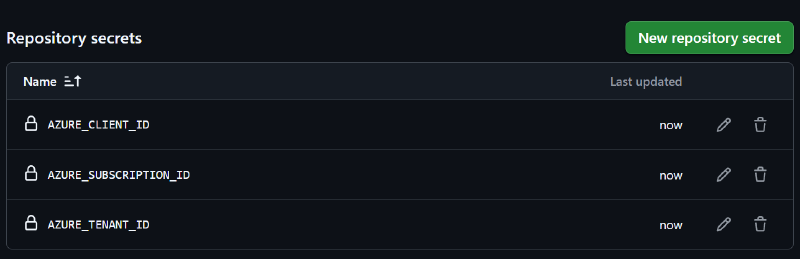
I will go to my GitHub Repository -> Settings -> Secrets and variables -> Actions. I will then add the following “Repository secrets”:
AZURE_CLIENT_ID: The$appIdfrom Step 2.AZURE_TENANT_ID: Your Azure Tenant ID (az account show --query tenantId -o tsv).AZURE_SUBSCRIPTION_ID: Your Subscription ID ($subId).
Terraform#
Back in VSCode, I will create a new folder called terraform, create 2x files inside and populate them as below:
terraform/providers.tf
Defines the Terraform “backend” which comprises of:
- Which provider to use
- Where to store the state file
- How to connect
terraform {
  required_providers {
    azurerm = {
      source  = "hashicorp/azurerm"
      version = "~> 3.0"
    }
  }
  backend "azurerm" {
    resource_group_name  = "<rgname>"
    storage_account_name = "<saname>" # Must match Phase 1
    container_name       = "tfstate-blog"
    key                  = "prod.terraform.tfstate"
    use_oidc             = true
  }
}

provider "azurerm" {
  features {}
  use_oidc = true
}
terraform/main.tf
Defines the two resources that will be deployed, the resource group and the static webapp and an output the deployment token to feed back into GitHub to allow GitHub Actions workflow to push the Hugo site on update.
resource "azurerm_resource_group" "blog" {
  name     = "rg-securityblog-prod"
  location = "westeurope"
}

resource "azurerm_static_web_app" "blog_app" {
  name                = "swa-benstalker-tech"
  resource_group_name = azurerm_resource_group.blog.name
  location            = azurerm_resource_group.blog.location
  sku_tier            = "Free"
  sku_size            = "Free"
}

# We output the deployment token so GitHub Actions can use it to push the Hugo site
output "swa_api_key" {
  value     = azurerm_static_web_app.blog_app.api_key
  sensitive = true
}
At this stage, I will commit and merge with the GitHub again.
GitHub Actions Pipeline#
Next I will define the GitHub actions workflow by creating a file at .github/workflows/deploy.yml. This workflow logs into Azure securely via OIDC, runs Terraform to build the infrastructure, extracts the SWA token dynamically, and deploys your Hugo site.
YAML
name: Deploy Infra and Blog

on:
  push:
    branches: ["main"]

# REQUIRED for OIDC Authentication
permissions:
  id-token: write
  contents: read

jobs:
  build-and-deploy:
    runs-on: ubuntu-latest
    steps:
      - name: Checkout Code
        uses: actions/checkout@v4
        with:
          submodules: true
          fetch-depth: 0

      - name: Azure Login via OIDC
        uses: azure/login@v2
        with:
          client-id: ${{ secrets.AZURE_CLIENT_ID }}
          tenant-id: ${{ secrets.AZURE_TENANT_ID }}
          subscription-id: ${{ secrets.AZURE_SUBSCRIPTION_ID }}

      - name: Setup Terraform
        uses: hashicorp/setup-terraform@v3

      - name: Terraform Init & Apply
        id: tf
        working-directory: ./terraform
        run: |
          terraform init
          terraform apply -auto-approve
        env:
          ARM_CLIENT_ID: ${{ secrets.AZURE_CLIENT_ID }}
          ARM_SUBSCRIPTION_ID: ${{ secrets.AZURE_SUBSCRIPTION_ID }}
          ARM_TENANT_ID: ${{ secrets.AZURE_TENANT_ID }}
          ARM_USE_OIDC: true

      - name: Get SWA Deployment Token
        id: get_token
        working-directory: ./terraform
        run: |
          SWA_TOKEN=$(terraform output -raw swa_api_key)
          echo "::add-mask::$SWA_TOKEN"
          echo "swa_token=$SWA_TOKEN" >> $GITHUB_OUTPUT

      - name: Build and Deploy Hugo to Azure Static Web Apps
        uses: Azure/static-web-apps-deploy@v1
        with:
          azure_static_web_apps_api_token: ${{ steps.get_token.outputs.swa_token }}
          repo_token: ${{ secrets.GITHUB_TOKEN }}
          action: "upload"
          app_location: "/"
          output_location: "public"
I then committed and pushed these changes to GitHub. When the workflow was detected, it was immediately kicked off by GitHub:
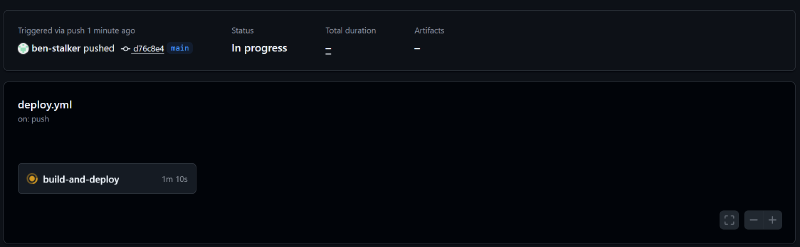
The workflow completed successfully and we have our very first version of this blog published.
FQDN & DNS#
The last step is to buy the domain, configure name servers to point at Azure then setup the necesarry DNS records in Azure. I have got into the habbit of using godaddy for all my domain names and this site will be no different.
Now I’ve purchased, I will need to update the configuration for the Azure Static Website as well as in GoDaddy. First up, Godaddy:
GoDaddy Configuration#
I have the default Azure hostname for this website: agreeable-grass-08e492903.1.azurestaticapps.net. In GoDaddy, I will edit the existing CNAME record for www pointing at the this URL.
Terraform#
Next up is adding this custom domain name via Terraform to the static webapp. I will add this resource block to my main.tf file:
# Adding CNAME record to static web app
resource "azurerm_static_web_app_custom_domain" "www_domain" {
  static_web_app_id = azurerm_static_web_app.blog_app.id
  domain_name       = "www.benstalker.co.uk"
  validation_type   = "cname-delegation"
}
With this in place, I can commit and push the code changes to GitHub, triggering a fresh GitHub Actions run. When completed I see the following:
![[Pasted image 20260301213512.png]]
Now the root domain. Due to limitations, this must be done by button clicking in the portal. Not great, but it’s what we have when using Azure. I will button click on the following manor:
1. Generate the Token in Azure
- Go to Azure Static Web App in the portal.
- Click Custom domains -> + Add -> Custom domain on other DNS.
- Enter
benstalker.co.ukand click Next. - Azure will generate a TXT validation token.
2. Add the TXT Record to GoDaddy
- Go to GoDaddy DNS management.
- Add a new record.
- Type:
TXT - Name:
@(This represents the root domain) - Value: Paste the token from Azure.
- Save it.
3. Validate and Route
- Back in Azure, click Validate. (Wait a few minutes if it fails the first time).
- Once it validates, Azure will give you an Alias/A-Record IP Address.
- Go back to GoDaddy, add an
Arecord with the name@pointing to that IP addresses
